Refer to Counter Worksheet Details for an introduction to using the worksheet to enter counter documents, and for the parameter settings that impact how the worksheet processing can be customized refer to Counter Worksheet/Contract Tunable Parameters.
The option is provided for the Counter Worksheet Start With point to be set by store or division, in the Divisional Contract Parameters to one of the following four defaults:
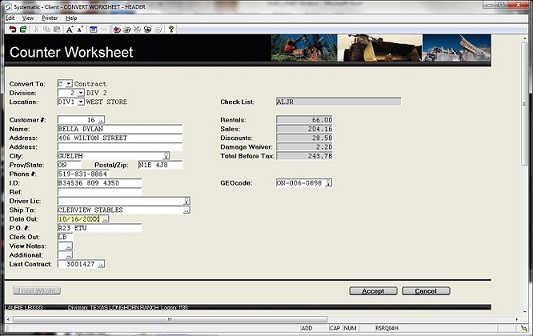
Example:
This page explains the Counter Worksheet Header features and the prompts to complete the header as follows:
Enter R if the worksheet represents a Reservation.
When a reservation is created, the actual creation date and time is
saved. This date and time stamp can be viewed in the reservation
header screen of Reservations.
Enter Q if the worksheet is being used to build a Rental Quote.
Enter L to select and Load an existing worksheet from the Load Saved Counter Worksheet window.
If this is a new contract, accept the Auto-assigned next available sequential document number, or over-type it with a preferred document number.
The ability to over-type the document number is controlled by the Allow Custom Document# flag for the document type defined in Last Used Transactions.
All income, revenue, and expenses are tracked by the division,
and posting to the correct G/L accounts for that Division is
automatic.
Special Rates can also be setup for the Division are setup in the
"Rental Rates & Pricing" parameters on the Operations
tab of Configure System Settings in
Special Rate Codes window.
Note: A Type can be set for a division to restrict it from being use as a document division in Divisions.
G/L transactions to update inventory costs always post to the G/L Location from which the inventory was relieved.
Note: A Type can be set for a division to restrict it from being use as a document location in Divisions.
Saved Worksheet Location:
If this document is a previously saved worksheet and the location
on the header is changed, the location is also changed for any
Groups on the worksheet, and although the location is not also
automatically changed for products on the worksheet, a warning is
triggered so the operator is aware that the location on the product
details is different from the document header.
If the locations that these products have been booked from should
also be changed, the products need to be deleted from the worksheet
and re-added so that they are taken from the new location.
Selection options:
The values for the selected customer will then be applied for
the remaining fields in the document header, and only windows
requiring information will open.
The Rental Period window is mandatory and
will always open.
Note: If the Customer number is changed on an existing Contract, the existing Salesman code will be replaced with the Salesman associated with the new customer.
A flag in the Company Security Parameters can be set to prevent a customer number from being entered on a document if the customer's Credit Limit has been reached or exceeded.
After the warning is acknowledged, the operator may be able to continue to enter the document, depending on the credit warning flag in Credit Ratings.
Reason Code:
Over-ride Reason Code tracking can also be activated for the clerk
to explain why it was overridden, as outlined in Reason Code for Override.
Note: For Cash customers the Damage Waiver requirement set in Customer Information cannot be changed on the document if the Use Damage Waiver Per Item Value Limits feature is activated in the Company Standard Waiver Settings, so the option to accept or decline Damage Waiver is not allowed if the customer is a Cash customer with this processing.
VIEW CONTRACTS
A second window provides the ability to view information on any
contracts for this customer.
Adding a Cash Customer:
If the customer # field is left blank and an existing customer is
not selected for the document and the Add Cash Customers
feature is activated in the Division Contract
Parameters then a new customer record will be created, assigned
a customer number and permanently added to Customer Information.
When a new customer is added they are automatically given website
access with a default password that matches their new customer
number and a default email address that matches their new customer
number@GW.COM
This web access information can always be modified in this Internet Information window or in the Portal Customer screen later.
Other customer values and flags will default to match those setup
for the division's "Clone" customer as assigned in the "Customer
Settings" of Divisional Contract
Parameters.
For information about adding full details for a new customer
record, refer to Customer Information.
If the Add Cash Customers feature is also configured to Add Contact in the Division Contract Parameters then the Cash Customer Information window is triggered to capture unique customer and contact values.
If the Add Contact option is not activated, in Contracts
or on the Worksheet, the operator will be prompted for the Alpha
Key that is used to sort the customers in reports and lists,
and then for the language preference.
If the Add Contact option is not activated, in Quotations and Reservations the operator will be prompted for the
language and alpha key information as outlined in Cash Customers Information.
This is a mandatory address field if your firm has activated the Texada Mobile service in the Logistics configuration.
A flag in the Required Document Information in the
Company Contract Parameters can be set to
ensure that this Bill To City is a valid city registered in
City Tax Codes.
When the Bill To City is mandatory on documents, if there is
a 'Prov' and/or a 'Postal' code associated with the city in the
City Tax Codes table then these
Province/Postal values will default to the Billing address when the
city is entered on the address.
A flag in the "Required Document Information" in the Company Contract Parameters can be set to force the
operator to enter a valid Postal or Zip code to match the mask
format as setup for the customer's currency in Currency Codes.
This value defaults from City Tax Codes if
Bill To City is mandatory and the City has a Postal
code defined.
When Vertex tax processing is activated in the Company Taxing Parameters this address of Street,
City, Prov/State, and Postal/Zip is validated against the Vertex
database.
If there is a discrepancy in the address information, a Vertex
error is triggered, and the address must be corrected.
If only a partial address is entered (e.g. no Postal/ZIP ), Vertex
attempts to find the tax area for the information that is supplied,
but if multiple tax areas could apply a Vertex error is triggered,
and more specific address information must be entered.
If this customer has anyone setup on the Name Check List
in Customer Information, file, or if this
is a mandatory field, then the Name Check
List Select window will open displaying a list of individuals
related to this customer.
The operator can check if this person is allowed to charge rentals
for this firm, or if this is a mandatory field, the operator must
select a "valid renter" to associate to the document.
If a name is selected in the window, this name will print on the
document comments as "PICKED UP BY: Name".
For standard documents and Crystal Forms the wording of the text
preceding the name on the document can be customized for two
languages in the Document Field Labels
table.
For Jasper documents refer to Jasper Appearance and
Formatting window of Customer Forms
for the language and label controls.
This field can be optional or mandatory according to the parameter setting for Cash or On Account customers set in Divisional Miscellaneous Parameters.
This field, can be optional or mandatory according to the parameter setting for Cash or On Account customers set in Divisional Miscellaneous Parameters.
Note: If the Customer # is blank (e.g. Cash Customer) the Driver's License # entered here is not stored anywhere, except on this contract, and the window is disabled.
If the Prompt for Driver's License/ID flag is set in the
Divisional Contract Parameters the cursor
will stop on this field if a single valid Driver's License is not
already saved in Customer Information.
The Driver's License is mandatory information if the Mandatory
Driver's License flag has been set in the Divisional Contract Parameters and the customer is
not the Blank customer.
During contract entry, the Ship To address defaults to the Bill
To address, since equipment is often used at the same place as it
is billed.
When the Ship To address is different, enter the number or short
form for the site or job that relates to this contract, or select a
site from the window, or over-type the "Ship To" with the actual
place the equipment was used.
The site address information displays as it will print on the document.
A flag in the Additional Information for
each customer can be set, forcing the operator to enter a valid
site code on each document for this customer, with the exception of
Point Of Sale Invoices.
A flag in the Required Document Information in the Company Contract Parameters can be set to ensure
that this Ship To City is a valid city registered in
City Tax Codes.
When the Ship To City is mandatory on documents, if there is
a 'Prov' and/or a 'Postal' code associated with the city in the
City Tax Codes table then these
Province/Postal values will default to the Shipping address when
the city is entered on the address.
Customer and global sites are setup in Customer Site Information.
The Site window can also be set to open automatically.
This is controlled by the division flag in the Additional Pop-Up Windows, in the Divisional Contract Parameters.
Select a Global or customer site, or add a site in the window as
outlined in Site Search.
Click the CANCEL button or the ESC key to exit this window if event rates do NOT apply to this document, or enter the event information as outlined in the Location and Event Information window.
Note: If the GEOCode or the Taxes are changed on an existing document a warning is triggered that the details and services taxes need to be changed manually if required.
The Tax window in the sub-menu at the end of the header screen displays the taxes and exemptions to be applied on this document.
Note: When an existing Contract is reviewed in Change mode and the date is not changed, the Date Range control does not require the date to be changed to within the current range.
Special rates setup for the customer in the Special Rental Rate Matrix, respect this date when checking for the effective and expiry dates, rather than the product detail Date Out.
On an existing contract this Rental Period window can be re-accessed from the Date Out/Date Due information accessible in the Additional Information window of the document, by windowing again on the Date Due field.
This is a mandatory field if the P.O. # Required flag has
been set for this customer in the Customer
Information.
A blanket default P.O.# can also be assigned in Customer Information, and a Site specific default
P.O.# can be assigned in Site
Information.
The relevant P.O. then defaults to the document but can be
over-typed as required.
If the customer does not require a P.O. this field will be skipped, but can still be accessed if required.
If the flag to Prompt for Clerk is not set in the
Company Security Parameters, then the
operator code currently signed into the session will automatically
display but can be over-typed as required .
If Prompt for Clerk is activated a valid operator code must
be entered in this field and the clerk name will print on the
document.
A further flag can be set to require the operator's password to
verify the clerk's identity.
Enter the Salesman code or selected one from the window, as setup in Salesman Codes.
RENTAL/SALES DISCOUNTS:
Window to access and set the Rental/Sales
Discounts information for this document.
LOYALTY PLAN:
Window to access and set the Loyalty Type
information for this document.
NO CHARGE WEEKENDS:
Window to review and set the No Charge
Weekends information for this document.
SALESMAN:
Window to assign a Salesman code to this document, as outlined in
Salesman.
DAMAGE WAIVER:
Window to review and set the Damage Waiver
information for rental equipment on this document.
DATE OUT/DATE DUE and DAYS TO BILL:
Set the document dates and billing period as outlined in Date Out/Date Due.
NAME CHECK LIST:
Window to access the Name Check List
Select information on this document.
When the customer number on the document was selected by entering or scanning an FOB code, the associated name from the Name Check List becomes the default on the document, if that employee has permission to rent.
DEFAULT TAX CODES:
Window to review and set the Default Tax
Codes.
Note: If the GEOCode or the Taxes are changed on an existing document a warning is triggered that the details and services taxes need to be changed manually if required.
EVENT START AND END DATES:
Window to review and set the Event Start/Finish
Dates if an event has been set on this document.
OFF RENTAL REASON CODES:
Window to review and set the Valid Off Rent
Reason Codes for this document.
BUSINESS SOURCE:
Window to review and set the Business Source
for this document.
BILLING HISTORY:
This option is only available from the "Additional Info" window on
a Contract header, not a Worksheet header.
The billing history can be viewed as outlined in Billing History.
FILE ATTACHMENTS:
Window to review and set any File
Attachments associated with this document.
The link to an attachment will be passed on to any resulting
documents created by converting this document.
e.g. Reservation to Contract, or Contract to Invoice
CREATED BY:
In Change Mode window to view the date and time this document was
created and whether it was Staff that created the document through
the application, or whether it was a a Customer or Salesman that
initially created the original document request through Web
Services or Portal.
The associated email address is displayed.
DOCUMENT EMAIL:
Window to review and enter an Email Address associated with this
document.
This value is used by the 'Logic Platform' in the search
utility to find a document.
It is not used for actual emailing at this time.
PROFILE CLASS
Window to review and set the optional Profile
Class to be linked to the document for Business Analysis
reporting.
CUSTOMER SURVEY
Window to review and set the Customer
Satisfaction Survey request flag.
Type No if no alert or delivery tracking is required on this document.
Type Yes to automatically send an email with the Contract or
Reservation information to the address defined for the division in
Divisional Delivery/Pickup Parameters to
alert staff of the customer's requirement.
The document will also be included in the Delivery/Pickup Dispatch with a status of
WCALL.
Note: If the worksheet is saved instead of converted, the 'Will Call' alert and dispatch record will be generated when the worksheet is converted.
If any product details already exist on this worksheet the following options are provided after the document header has been completed:
Confirmation Action Options:
To convert to a Contract, any Groups on the worksheet must be replaced with specific product numbers, and any serialized Sales Parts must be assigned serial numbers or selected from the Serial Number Search window.
If any item on the worksheet cannot be filled (i.e. serialized part # or Group product not selected, etc.) the worksheet will not be converted, but will be saved to the Saved Worksheet file.
Note: When a worksheet is converted, the product detail information is recalculated per the worksheet header, so the new document may not reflect any individual product date changes or discount changes made in the worksheet details.
Click Delete Worksheet to abort the worksheet and delete the details from page so the products can be re-entered.
If a saved worksheet is to be deleted, confirmation is required to delete the worksheet, and a record is written to Delete Log to note the Contract # that was used. The deletion record is listed under function RSRQ04G. The key WS# is assigned and the operator code, worksheet number and deletion date are tracked.
Any product detail lines that are deleted from a saved Worksheet, also write a record to Delete Log to track the product information that was deleted from the document under function RSRQ04.
Note: A Worksheet with unposted deposits cannot be deleted.
Any Deposits need to be credited or reversed in Counter Worksheet Totals and Daily Close 1 must be run to post them, before
that Worksheet can be deleted successfully.
Click Load Saved Worksheet to re-access an
existing worksheet as outlined in Load Saved
Counter Worksheet.
When the product details from a saved worksheet are being viewed on
the screen, the Worksheet # is displayed in the top left
corner of the screen.
A flag in the Counter Worksheet Defaults of Company Contract Parameters can be set so that when a saved worksheet is re-loaded, the operator is immediately prompted to convert the document to a contract.
Click Save and Print Worksheet to complete the
worksheet header information, save it, and print a copy.
Refer to the details on the action to Save Worksheet below,
for information on the parameters and options available in the save
process.
Then to print the worksheet a printer can be selected from the Printer option located on the menu bar at the top of the screen, and the operator is now prompted:
Click NO to print the worksheet without prices, rates, and extensions.
Click Return to Details to review the product details of the current Worksheet again as outlined in Counter Worksheet.
Click Save Worksheet to save the product details
to a worksheet with a permanent contract #, that can later be
re-loaded.
The details are then erased from the current screen display.
The header information MUST be entered before the worksheet can be saved.
A prompt in the Company Contract
Parameters controls how the saved worksheet is numbered.
The auto-assign option, numbers the worksheet with the next
available contract number. Alternatively, the operator can be
prompted to enter a New Worksheet# number of choice.
When the worksheet is later converted to a contract, this number
will then also become the contract number.
The Services and Totals window is triggered if one of the Counter Worksheet Defaults in the Company Contract Parameters has been set to prompt for Services or to prompt for a worksheet Deposit, as outlined in Counter Worksheet Totals.
If the Worksheet was originally created by converting from a Reservation using the utility Convert Reservation To Counter Worksheet the Services and Totals window that determines deposit and service information will display, even if the Counter Worksheet Defaults in the Company Contract Parameters are set to suppress this totals screen when saving a worksheet.
Click Quit Worksheet to abort the document entry and to clear the products off the worksheet.
CONVERT Requirements:
The following information may
be required to complete a document conversion:
Click YES to specify which off rental codes should be permitted on this document as outlined in Document Off Rental Reasons.
DELIVERY AND PICKUP SERVICE CODES
The Delivery And Pickup Service Codes on
Document dialog pop-up window is triggered only if a rental
product on this document belongs to a Group with associated Type D
services for Delivery or Pickup setup in the Group Service Codes, and the document has been
flagged for Delivery and/or Pickup on the document header.
Refer to Group Delivery/Pickup Type-D
Service Overview for information on this feature.
CONVERT GROUPS
When a worksheet with a group is
converted to a Reservation or Quotation, the group is converted
with the Group.
But when a worksheet with a group is converted to a Contract, the
specific equipment must be selected from the group.
A selection screen appears for the group, displaying the quantity
from the worksheet and the quantity already selected for this
contract.
Any Sale Items and items flagged as Not Allowed to Rent, are
not included in the displayed list of products in the group.
Enter the specific rental product number or window to view and
select from the products in the group with the quantity
available.
A warning is generated if a product from a different Group is selected to replace the group on the worksheet.
OVERBOOKING
When the worksheet is converted to a reservation or to a contract,
the products are checked again for any overbooking.
Any overbooked items display on the screen with quantities
available as outlined in Minimum Availability
Exceeded window.
Note: Availability is not checked when a worksheet is converted to a quote.
PRODUCT SEQUENCE WINDOW
The product details can remain in the sequence that they were
entered, or they can be re-sorted to display on the screen and to
print on the document in a preferred order.
Refer to Document Sort Preference for more
information about this divisional controlled feature.
The document summary totals screen is displayed as outlined in Contract Summary and Totals screen.
ACTIONS:
Additional actions provided by buttons on
the Worksheet header screen include:
Note: A flag in the Counter Worksheet Defaults of Company Contract Parameters can be set so that when a saved worksheet is re-loaded, the operator is immediately prompted to convert the document to a contract.
ACTIONS:
Additional actions provided by buttons on
the Contract header screen include:
Link a File to this Document:
Click the ATTACHMENTS button to review and set any
File Attachments associated with this
document.
The link to an attached document will be passed on to any resulting
documents created by converting the contract to an invoice.
A green check mark is displayed to alert the operator when there are any associated attachments.
Document Signature:
A "note page" icon is displayed to alert the operator when the
document has been signed and the signature can be viewed in the
File Attachments by clicking on the
ATTACHMENTS button.
Note: Signed document attachments cannot be deleted.
| Converted from CHM to HTML with chm2web Pro 2.85 (unicode) |