Standard SRM menus are not available as they cannot be modified.
The custom menu is displayed as a folder that can be expanded or
collapsed on the right portion of the screen under MENU
MAINTENANCE panel.
Options/functions, and existing menus/sub-menus can be selected to
be included or removed in the custom menu, and will be displayed as
they will appear in the menu tree.
Create a Custom Main Applications Menu:
Because the standard Texada SRM applications menu cannot be
modified to include custom menus, a copy of the SRM Applications
menu can be created by right clicking on the custom menu in the
MENU MAINTENANCE panel, and then clicking on Add Base
Menu Options in the resulting action menu.
Links are created to all the original menus. Menus can be deleted
as required and additional custom menus can be inserted.
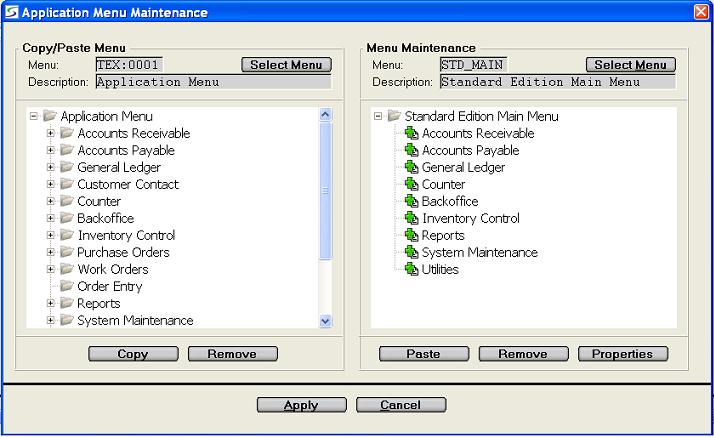
Example where the new custom Base 'Applications Menu' is called
Standard Edition Main Menu, showing the menu tree links before the
APPLY button has been clicked to accept the new
sub-menus:
Remove Option from the Custom Menu:
Existing options and sub-menus can be deleted from the custom menu
on the MENU MAINTENANCE panel, by clicking on options
individually to highlight them or highlighting a group of options,
and then clicking the REMOVE button.
Note: The options on any standard menus and sub-menus that have
been copied can not be edited, and will show as locked.
Standard menus and sub-menus can only be added or deleted in their
entirety.
Alternatively right click on the option or sub-menu in the on the MENU MAINTENANCE panel to be deleted, and click the Remove option in the resulting action menu.
Update Name and Quick Launch Information:
The function and quick launch information can be viewed and updated
in the custom menu by highlighting the relevant option on the
MENU MAINTENANCE panel, and clicking on the
PROPERTIES button, as outlined in Application Menu / Properties.
Alternatively right click on the option or sub-menu in the on the MENU MAINTENANCE panel, and click the Properties option in the resulting action menu.
Build or Add to the Custom Menu:
There are several approaches to defining the options to be included
in menus:
- COPY/PASTE Method:
Select a source menu in the left portion of the screen to be displayed on the COPY/PASTE MENU panel, using the SELECT MENU button to search for an existing menu as outlined in Menu Search.
The selected menu and its options are displayed in the left panel.Note: All menus, custom and SRM standards, can be used as a source for the copy in the COPY/PASTE METHOD panel.
The procedure to copy options from the source menu and paste them into the custom menu is as follows:
- Select the options to copy from the COPY/PASTE MENU:
- Click on the options individually or highlight a group of
options to be copied and then click the COPY
button.
The options will be marked with the "clipboard" symbol until they are pasted in the custom menu, or until they are removed from the "clipboard" by clicking on the REMOVE button below the left panel.Alternatively right click on the options individually, or highlight a group of options and right click with the mouse, to use the commands provided in the resulting action menu.
The Copy to Clipboard, and Remove from Clipboard actions are the same as the COPY and REMOVE buttons.The Clear Clipboard option removes all items on the left panel from the clipboard.
Additional options are provided to Expand All and Collapse All on the menu tree in the left panel.- Paste the options from the clipboard into the MENU
MAINTENANCE:
- The custom menu being created or modified is displayed in the
right portion of the screen or can be re-selected using the
SELECT MENU button to search for an existing custom
menu as outlined in Menu Search.
Select the location on the custom menu in the MENU MAINTENANCE panel, to paste the options from the clipboard by clicking on the folder or highlighting the option under which the new option should appear.
Options can then be pasted into an existing custom folder or below an option or folder, by clicking the PASTE button.Alternatively select the position to paste the new option by right clicking on the option or sub-menu and use the Paste from clipboard command provided in the resulting action menu.
The Paste into New Folder option can be used to create a new folder with a quick launch code that will contain the option being copied. Additional options or sub-menus can then be pasted into the new folder.
Action options are also provided to Expand All and Collapse All on the menu tree in the right panel.
Use the Reload Menu option to clear the clipboard and to "undo" any modifications to the custom menu that have not yet been applied.- Finished?
- Click APPLY to accept activate the custom menu with all its modifications.
- Finished?
- The custom menu being created or modified is displayed in the
right portion of the screen or can be re-selected using the
SELECT MENU button to search for an existing custom
menu as outlined in Menu Search.
- Paste the options from the clipboard into the MENU
MAINTENANCE:
- Click on the options individually or highlight a group of
options to be copied and then click the COPY
button.
- Select the options to copy from the COPY/PASTE MENU:
Sometimes a custom program is designed by Texada Software specifically to meet your unique business practices.
These programs can be added to a custom menu on the MENU MAINTENANCE panel as follows:
Then click on the Add New Function command in the action menu and select a custom program from the resulting search window, where the properties of the custom program including description and quick launch code can be modified.
Note: Only custom menus or the Additional Options
menus can be modified.
Custom programs cannot be added to standard Texada SRM
menus, as they may be lost when SRM updates the standard menus with
new features.
For more information on setting up custom menus refer to Additional Menu Options.
Finished?
On returning to the Main Menu tree, right click on the menu tree and click Refresh to rebuild the current menu tree display.