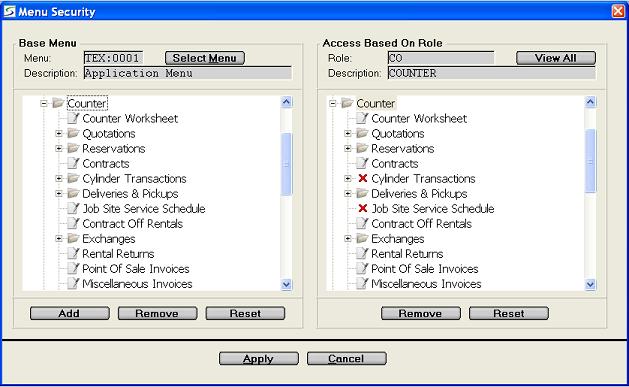
When the Counter menu is loaded for an operator with access to only the 'CO' role, that operator would not see the 'Cylinder Transactions' or 'Job Site Service Schedule' in his version of the Counter menu.
This utility can be used to define which menus and options
should be accessible by operator Role. An operator will not see a
menu or a menu option if his role does not have permission.
If multiple roles are assigned to an operator, and any one of his
roles has access to a menu or option, then the operator does have
access, even if his other roles do not.
This menu permissions utility can be accessed from Security Roles in the window on the View
Menu field for each Role.
This utility cannot be accessed at the same time custom menus are
being updated in Application Menu
Maintenance.
Note: If an operator has role permission to Security Roles on the Security tab, but does not have role permission to access Application Menu on the System tab then this Menu Permissions screen will be display only and cannot be updated.
Restricting Role access to Specific Programs within a
Menu:
A role can be assigned at the Menu level, and then specific options
can be removed from the menu based on that role, so that operators
assigned that role can access the menu but would not see the
options that have been removed.
The option to define general Menu Security is provided using the Export/Import actions in the Security Roles screen as outlined in Import Security Roles.
The Menu Security can also be setup and maintained or fine tuned for a selected Role in the View Menu window, as follows:
Initially for a new role, the default Base Menu displays
the standard Texada SRM Applications Menu, to allow
selection from all standard menus and options.
Accept the Base Menu or click on the SELECT
MENU to select a specific menu for the source menu from the
Menu Search window.
Note: If your firm uses custom menus as setup in Application Menu Maintenance, replace the standard SRM Applications Menu on the Base Menu panel, with your custom main Applications Menu for the source menu.
Texada SRM standard menus can be identified by the
preface TEX:.
Custom menus can be setup and maintained in the Application Menu Maintenance window in the "General
Settings" on the System tab of the Configure System Settings.
Select Options to be Accessible by this Role:
Identify the menus and option in the source menu that is currently
displayed in the left panel, that should be accessible to this role
by clicking on an entire menu, or a specific option, or a group of
options, to highlight the selection, and then click the
ADD button.
The selected options will appear with a green check mark until they
are accepted or cleared.
Alternatively right click on the option or menu in the on the
Base Menu panel, and click the Add option in the
resulting action menu.
The selected options will appear with a green check mark until they
are accepted or cleared.
De-Select Options that should Not be Accessible by this
Role:
This action can be used to remove items already accepted and
currently displayed in the Access Based On Role panel.
It is useful, if an entire menu has been made accessible, but
specific options need to be removed.
Highlight the menu or option or group of options that should not
be accessible to this role and click the REMOVE
button.
The selected options will appear with a red X mark until they are
accepted or cleared.
Alternatively right click on the option or menu in the on the
Base Menu panel, and click the Remove option in the
resulting action menu.
The selected options will appear with a red X mark until they are
accepted or cleared.
Un-Flag Selected Items in the Base Menu:
Highlight the menu or option or group of options to unflag and
click the RESET button to remove any green check
marks or red X marks on these specific items in the Base
Menu panel.
Alternatively right click on an option in the Base Menu panel, and click the Reset option in the resulting action menu to remove a specific flag.
Un-Flag All Items Selected in the Base Menu:
Right click on the Base Menu panel, and click the Start
Over option in the resulting action menu to clear all
green check marks or red X marks in the Base Menu panel, to
re-start the selection.
Menu Tree display in the Base Menu:
Right click on the Base Menu panel to access the additional
options including Expand All and Collapse All for the
menu tree.
To update a different operator role, exit this window back to Security Roles, and open the View Menu window for the new role.
Alternatively to view all the menus and options available to
this role in the menu tree, select the main Applications Menu that
your firm uses, and display it in the Base Menu panel.
The Access Based On Role panel will then reflect the
corresponding accessible options selected from the source menu.
i.e. The standard Texada SRM Applications Menu is TEX:0001,
though your firm may have built a custom one.
Remove Option from the Role:
Existing options can be deleted on the Access Based On Role
panel, by clicking on options individually to highlight them or
highlighting a group of options, and then clicking the
REMOVE button.
The selected options will appear with a red X mark until they are
accepted clicking APPLY or cleared by
RESET.
Alternatively right click on the option or menu in the on the
Access Based On Role panel to be deleted, and click the
Remove option in the resulting action menu.
The selected options will appear with a red X mark until they are
accepted or cleared.
Un-Flag Selected Items for the Role
Highlight the menu or option or group of options to unflag and
click the RESET button to remove any green check
marks or red X marks on these specific items in the Access Based
On Role panel.
Alternatively right click on the option in the Access Based On Role panel, and click the Reset option in the resulting action menu.
Un-Flag All Items Selected for the Role:
Right click on the Access Based On Role panel, and click the
Start Over option in the resulting action menu to clear
all green check marks or red X marks in the Access Based
On Role panel to re-start the selection.
Menu Tree display in the Access Based On Role Panel:
Right click on the Access Based On Role panel to access the
additional options for the menu tree including Expand All
and Collapse All.
Note: When menu security is changed, the menus will be refreshed for all operators the next time they sign in or if they are currently in the software, the next time they return to a menu.
| Converted from CHM to HTML with chm2web Pro 2.85 (unicode) |