Counter Menu -> Exchange by Contract -> Create Work Orders For Returned Equipment
Counter Menu -> Delivery & Pickups -> Pickup Console -> Close Pickup Ticket -> Create Work Orders For Returned Equipment
This feature applies only to non-bulk items belonging to a Group that is flagged to Create W.O., so that this window is triggered when the non-bulk rental product is returned on a Rental Return or Exchange By Contract.
Division and Location mapping can be defined in the Divisional Work Order Parameters so that the new
W.O. gets created for the Service Division and Location instead of
the source contract division and location.
If no mapping has been defined for this division, then the Division
and Location assigned to the resulting W.O. default from the Return
Location, unless that Return Location is not G/L type Division.
Then the WO Division defaults from the source Contract Division and
the WO Location only defaults from the Return Location.
An internal customer number can be defined in the 'Rental
Return Work Order Customer' field of the Division Work Order Parameters that is assigned to
the new service Work Order based on the document division.
If no default internal customer number is defined for a division
then the customer number and Site from the original Contract are
also assigned to the Work Order.
When the divisional internal customer is assigned to the new Work
Order in place of the Contract customer, the contract site is not
pushed to the W.O. either.
The source Contract# is written to the W.O. comment field for reference.
Note: On Exchange By Contract the Create W.O. screen is only triggered if the equipment being returned is also flagged as Available.
Example:
Note: This 'Create Work Order' feature is controlled by Group and is not related to the auto-create a Work Order feature when the Product Status Code is changed at Rental Return or Exchange, as outlined in Status Code Actions By Group.
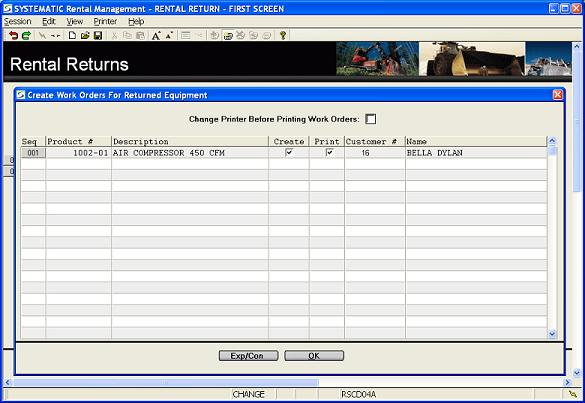
The information includes:
Check this box to trigger the Printer
Selection window prior to printing the W.O. documents.
This enables the Work Orders to be printed to a different printer,
such as the Shop or Service bay printer if required.
Uncheck this box to suppress the Printer Selection pop-up
window.
The printer can always be confirmed or re-selected from the Printer
option located on the menu bar at the top of the screen.
Uncheck this box if the non-bulk rental product does not require service and a W.O. should not be created at this time.
Note: For non-bulk rental products belonging to a Group that is flagged to create a W.O. but not to prompt, this field is checked and cannot be changed.
Check this box to print the new W.O. after the invoice has been generated.
Uncheck this box if the W.O. does not need to be printed
immediately.
It can always be printed later from Print Work
Orders
Inspection Forms for Texada Web Work Orders:
When Texada Web is activated in Logistics, then Inspection
Forms will be automatically added to the resulting Work Orders if:
| Converted from CHM to HTML with chm2web Pro 2.85 (unicode) |