- VENDOR #
- Accept the number automatically assigned for this vendor, or if
your vendors already have a number, over-type this number with your
numbering system using up to 6 characters.
To view an existing vendor in Change mode, enter the Vendor
#, or enter the first few characters of the vendor name (ALPHA
KEY) to list matches in the search/selection pop-up, or search for
the vendor in the Vendor Search
window.
NAME- Enter the vendor's name as it is to be printed on computer
checks.
QuickBooks Setup:
When integration with QB is configured in Integrated Accounting, the SRM vendor name must
match the vendor name in QuickBooks.
A window is provided to access the QuickBooks
Vendor Search and selecting a vendor in this window will change
the vendor name in SRM to match and link the name to QB.
ALPHA KEY- This controls the filing of the Vendor Names in alphabetical
order.
For example, if the vendor's name is Skytech Electronics Inc.,
enter SKYTECH as the alpha key.
If the vendor's name is The Factory Works, enter FACTORY WORKS as
the alpha key.
If the vendor's name is Jack MacQueen, then enter MACQUEEN as the
alpha key.
ADDRESS LINE 1 & 2- Enter the vendor's address, as it is to be printed on computer
checks.
If more space is required, use Address Line 2. Always use Address
Line 1 first.
CITY- Enter the vendor's city, to a maximum of 20 characters.
PROV/STATE- Enter the province or state, to a maximum of 5 characters.
This is a free format field, but the Prov/State Search window is provided to view and
select from standard province and state codes.
POSTAL/ZIP- Enter the postal or zip code to a maximum of 10
characters.
COUNTRY- Enter the country code or select one from the window.
This is an optional field. If a country code is entered, and the
city and province/state information is also stored, then the
complete country name will print on the vendor documents, reports,
and lists.
Additional country codes can be added in the window on the
"Country" field in the customer/vendor record. However country
codes can only be deleted from the utility Delete Country Codes, after all customer and
vendor records are checked for use of that code.
PHONE #- Enter the vendor's official sales telephone number.
- EXT #
- Enter the telephone extension number up to 4 characters, if
any.
FAX #- Enter the area code and Fax number to a maximum of 16
characters. Enter this exactly as it should be dialled, to enable
the faxing programs to dial out properly. For long distance, put a
1 in front, i.e. 1-519-836-1738 Do not use brackets or spaces.
Dashes are ok.
ACCOUNT # / QB ACCOUNT ID- Enter the account number your vendor has assigned to your
firm.
This will print on computer checks and Purchase Orders.
QuickBooks Setup: - QB ACCOUNT ID
When integration with QB is configured in Integrated Accounting, this 'Account#' field heading
is renamed to “QB Account ID”.
This “QB Account ID” field is populated with the 'Vendor
Internal ID' assigned by QuickBooks.
If this field is blank, a window is provided to access the QuickBooks Vendor Search window and select a vendor
to link the QuickBooks vendor to the SRM vendor.
The SRM/QB Vendors can be validated by clicking the
VALIDATE button at the bottom of the screen.
A/R CONTACT- Enter the name of the Accounts Receivable contact for this
vendor.
- A/R PHONE #
- Enter the phone # to call if there are questions about your
account.
- EXT #
- Enter the telephone extension number for the A/R contact.
CURRENCY- This field defaults from the company values in Company Information.
Enter C for Canadian, U for U.S., or A for Australian funds, or
select the currency for this vendor.
Invoices and payments for this vendor, default to this currency.
If the currency assigned here is other than the company currency
in Company Information, the currency
exchange posting processing can be activated from the Support Application Parameters using the exchange
rate setup in Currency Codes.
Contact Texada Support to activate the posting control flag to
automatically post the Currency Exchange.
TERMS DESC- This is the description of the vendor's payment terms.
This description can be an unrestricted free-form text describing
the terms of payment, or if the Valid Vendor Terms Required
flag is set in the Company Miscellaneous
Parameters the terms descriptions can be restricted to only the
descriptions defined in the Vendor Terms
Descriptions table.
Restricting the terms descriptions to a standardized text is
useful to reduce data mismatch errors when data is being
transferred to other software applications such as the Approval Plus processing which may not have import
validation scripts in place for data being imported into their
system.
Actual Due days and Discount information must be entered for
each vendor in order to age the A/P invoices correctly and to
determine the correct payment date.
Description Example 1: "Net 30" - the credit period is 30 days,
discount period is blank, and discount percentage is blank.
Description Example 2: "2% 10 days, Net 30" - the credit period is
30 days and the discount is 2.0 % if paid within the discount
period of the first 10 days.
DUE DAYS- In Example 1 above, the payment is due in 30 days. Type in
30.
In Example 2 above, the payment is due in 30 days. Type in 30.
- USE ACTUAL DATE
- Uncheck this box if the "Due Days" is the number of days,
rather than the actual date.
Check this box to use the value in the "Due Days" field as the
actual date in the next month. i.e. the 30th of the month
DISCOUNT DAYS- In Example 1 above, leave this field blank if there are no
discount days.
In Example 2 above, the discount days are 10. Type in 10.
- USE ACTUAL DATE
- Uncheck this box if the "Discount Days" is the number of days,
rather than the actual date.
Check this box to use the value in the "Discount Days" field as the
actual date in the next month. i.e. the 10th of the month
DISCOUNT %- In Example 1 above, leave this field blank if there are no
discount.
In Example 2 above, the discount is 2%. Type in 2.00.
WARRANTY ACCT#- Work Order billing for parts, labor, and services, can be split
between the customer, internal repair charges, and warranty claims
from the Supplier.
If this Vendor provides any warranty coverage, enter a Warranty
Clearing G/L account number, or select it from the G/L Account Search window.
The Warranty Clearing G/L account needs to be first setup in
Chart Of Accounts, as Asset account. It
will be debited, with any amount on a W.O. that is charged to a
warranty claim for this Supplier. It is recommended to setup a
separate Warranty Clearing Asset account for each Vendor, rather
than a general Warrant Clearing account for all Vendors. This way
the warranty postings can be more easily reconciled in the G/L, to
the Warranty Claim Report printed by
Vendor.
If this vendor does offer warranty coverage, the taxes as
entered in the following two Tax Code fields will be respected on
warranty billings.
Leave this field blank if no warranty claims will be covered by
this Vendor.
COMMENTS- This field is free-form, and can be used for writing notes, up
to a maximum of 30 characters.
Window to access the Notes for this vendor.
SALES CONTACT- Enter the name of the Sales Representative.
- SALES PHONE #
- Enter the phone number to call to reach your Sales
Representative.
- EXT #
- Enter the telephone extension number for the Sales
Representative.
- SALES FAX#
- Enter the supplier's fax number to be used for faxing the
Purchase Orders from the Print Purchase
Orders utility.
Note: If no Sales Fax# is entered, the vendor's primary
Fax# will be used for the P.O., and will then be copied back
to this field from Update Fax Number For
Selected Vendors.
PURCHASES LTD- The purchases LTD (Lifetime to Date) totals will be maintained
automatically by the software.
This total includes current unposted invoices.
Window to view the total purchases by year or by month.
Note: If the vendor purchases total becomes out of sync and
needs to be reset, a warning indicator is displayed on the
screen.
Click on the ? for an explanation and reset the balance as
instructed, and although the LTD balance appears to have been
re-calculated, the corrected balance is not saved until the
operator saves For more information on resetting these running
balances refer to Recalculate Vendor
Balances/Purchases.
PURCHASES YTD- The purchases Year to Date total will be automatically
maintained.
This total includes current unposted invoices.
ACCOUNT BALANCE- Account balances are maintained automatically by the
software.
This total includes current unposted invoices.
This is a running balance total that does not necessarily
reflect the vendor's current account balance, if future dated
invoices or checks have been posted.
Note: If the account balance becomes out of sync and needs to be
reset, a warning indicator is displayed on the screen.
Click on the ? for an explanation and reset the account
balance as instructed, and although the account balance appears to
have been re-calculated, the corrected balance is not saved until
the operator saves the entire screen changes.
For more information on resetting these running balances refer to
Recalculate Vendor
Balances/Purchases.
COMMISSION %- If a commission applies, record it here. Enter 10% as 10.00.
This is stored for information purposes only.
ALT LANGUAGE- Check this box to indicate that this vendor requests the
alternate language in the print options.
Uncheck this box if this vendor uses the standard language
options.
QUALITY CERTIFIED- Uncheck this box if the Vendor is not certified.
Check this box if this Vendor is IS9000 certified, and capture
the following information:
- CERTIFICATION #
- Enter the certification number.
- TYPE OF GOODS
- Enter a description of the product line.
TAXES
-
- Parameters Controlling Vendor
Taxing:
- A setting in Company Taxing Parameters
controls whether the option is provided to automatically calculate
taxes as determined by the vendor information file, on each line
detail and add them to the invoice in A/P
Invoices.
A default Y/N that is respected in A/P
Invoices to utilize this feature, can be set by vendor in the
"Additional Information" window of Vendor Information.
If activated, the taxes will be included on the report available
in the Tax Activity Report.
-
If the above tax feature is activated, a further setting in
Company Taxing Parameters controls whether
the operator is also prompted to update the vendor record tax
codes, when changes are made in the choice of the 2 tax codes in
the invoice header of A/P Invoices.
-
If the feature to automatically add taxes to an Accounts Payable
invoice, has NOT been activated any relevant tax records must be
manually entered as separate line details in A/P Invoices, and the following vendor tax
selection applies only to Warranty claims.
- TAX 1
- Enter the tax code for Tax 1 that is applicable for this
supplier, or select it from the drop-down list as setup in Tax Codes.
- TAX 2
- Enter the second tax code for Tax 2 that is applicable for this
supplier, or select it from the window.
DIRECT CREDIT- This Direct Credit Payment prompt is only visible on the Vendor
information file screen, if the processing has been activated in
the company Company Information.
Set the Direct Credit information for this vendor in the window, as
follows:
Uncheck this box if this vendor should NOT receive A/P payments
directly from your firm's bank account into theirs.
Payments would then still need to be generated from Select Invoices - Computer Checks or Select Invoices - Manual Checks.
Check this box if this supplier should be paid by one of the
Direct Credit payment methods using the Direct
Credit Payments options.
This vendor number will no longer appear on the vendor list
generated in Select Invoices - Computer
Checks.
- Bank of New Zealand
- Westpac NZ
- ANZ NZ
If the processing activated in the Company
Information is set for the Bank of New Zealand, Westpac NZ, or
ANZ NZ, enter the following banking information for the vendor:
- PRINT REMITTANCE ADVICE
- Check this box if a Remittance Advice slip should be generated
for this supplier, each time that a Direct Payment is made.
Remittance Advice slips print form Print
Direct Payment Edit Report / Remittance Advice, on the
contract/invoice document form. The Remittance Advice can then be
mailed or faxed to the vendor to notify him of the payment
details.
Uncheck this box if a Remittance Advice slip is NOT required for
this vendor.
- BANK ACCOUNT NUMBER
- Enter the vendor's bank account number, to be debited by the
Direct payment amount.
This information will be included as part of the Direct payment
record, in the data file that is sent to the bank.
- REFERENCE
- Enter the vendor's reference number. This information must be
obtained from the vendor or his banking establishment.
This information will be included as part of the Direct payment
record, in the data file that is sent to the bank.
For the Bank of New Zealand, Westpac NZ, and ANZ
NZ this value can be alpha/numeric.
- CODE
- Enter the vendor's bank code. This information must be obtained
from the vendor or his banking establishment.
This information will be included as part of the Direct payment
record, in the data file that is sent to the bank.
For the Bank of New Zealand, Westpac NZ, and ANZ
NZ this value can be alpha/numeric.
- PARTICULARS
- Enter any details. This is information only.
-
Australian Banking Association (ABA)
If the processing activated in the Company
Information is set for ABA, enter the following banking
information for the vendor:
- PRINT REMITTANCE ADVICE
- Check this box if a Remittance Advice slip should be generated
for this supplier, each time that a Direct Payment is made.
Remittance Advice slips print form Print
Direct Payment Edit Report / Remittance Advice, on the
contract/invoice document form. The Remittance Advice can then be
mailed or faxed to the vendor to notify him of the payment
details.
Uncheck this box if a Remittance Advice slip is NOT required for
this vendor.
- ACCOUNT NAME
- Enter the title of account to be debited to credited.
- ACCOUNT#
- Enter the vendor's bank account number, to be debited by the
Direct payment amount.
This information will be included as part of the Direct payment
record, in the data file that is sent to the bank.
- BANK / STATE / BRANCH NUMBER
- Enter the valid Bank State Branch number or BSB code.
-
CPA 005 (1464 Byte)
If the processing activated in the Company
Information is set for CPA 005, it can be for HSBC Canada or
for the Bank of Nova Scotia. The Bank of Nova Scotia is recognized
by Bank ID 00220.
Enter the following banking information for a vendor:
- PRINT REMITTANCE ADVICE
- Check this box if a Remittance Advice slip should be generated
for this supplier, each time that a Direct Payment is made.
Remittance Advice slips print form Print
Direct Payment Edit Report / Remittance Advice, on the
contract/invoice document form. The Remittance Advice can then be
mailed or faxed to the vendor to notify him of the payment
details.
Uncheck this box if a Remittance Advice slip is NOT required for
this vendor.
- BANK ACCOUNT NUMBER
- Enter the vendor's bank account number, to be debited by the
Direct payment amount.
This information will be included as part of the Direct payment
record, in the data file that is sent to the bank.
- BANK NUMBER
- Enter the valid Bank number
- BRANCH NUMBER
- Enter the valid Bank Branch number.
-
CPA 005 (80 Byte)
If the processing activated in the Company
Information is set for CPA 005 80 Byte, it can be for the TD
Bank.
Enter the following banking information for a vendor:
- PRINT REMITTANCE ADVICE
- Check this box if a Remittance Advice slip should be generated
for this supplier, each time that a Direct Payment is made.
Remittance Advice slips print form Print
Direct Payment Edit Report / Remittance Advice, on the
contract/invoice document form. The Remittance Advice can then be
mailed or faxed to the vendor to notify him of the payment
details.
Uncheck this box if a Remittance Advice slip is NOT required for
this vendor.
- BANK ACCOUNT NUMBER
- Enter the vendor's bank account number, to be debited by the
Direct payment amount.
This information will be included as part of the Direct payment
record, in the data file that is sent to the bank.
- BANK NUMBER
- Enter the valid Bank number
- BRANCH NUMBER
- Enter the valid Bank Branch number.
Additional Financial Institution information for your firm must
be setup in Company Information.
For more information on this feature refer to Direct Credit Payments.
FILE ATTACHMENTS- Multiple external documents or images can be associated with
this vendor when setup in the File
Attachments window.
This field is disabled if there is no attachment directory
defined in Company Miscellaneous
Parameters.
CONTACTS- The Contact Information window is
provided to enter or view contact information for this vendor, and
to define the Contacts to receive emailed documents.
ADDITIONAL INFO- Window to access the additional order information fields for
the Vendor.
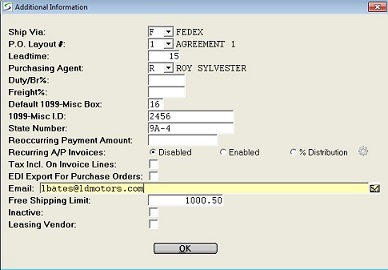
- SHIP VIA
- Enter the preferred shipping code for this Vendor or select one
from the drop-down list. This code will be used as the default for
P.O.'s for this Vendor.
Shipping codes are setup in Ship Via
Codes.
P.O. LAYOUT #- Enter the preferred shipping P.O. layout code for this Vendor
or select one from the drop-down list. This code will be used as
the default for P.O.'s for this Vendor.
The available layouts can be setup in Purchase
Order Layouts.
LEADTIME- Enter the lead time for new orders. This is used in Purchase
Orders to determine the expected delivery date of orders from this
supplier.
PURCHASING AGENT- Enter an active purchasing agent code for this Vendor or select
one from the drop-down list as setup in Purchasing Agent Codes.
This code will be used as the default for P.O.'s for this
Vendor.
DUTY/BR%- Leave this field blank if no allowance for duty or brokerage
costs, should be included in the cost of purchasing inventory from
this Vendor.
Enter the percent to be used in the LCF calculation, if there
should be costs for duty or brokerage included in the purchase of
inventory from this supplier.
e.g. 2.00 for 2%
This default % value will be displayed where inventory is
invoiced in A/P Invoices, or A/P Invoices By Purchase Order. If your firm
updates the inventory costs in the warehouse rather than in A/P
invoicing, this default % for Duty/Brokerage will be displayed in
Purchase Orders, and Warehouse Receiving instead of in the A/P
invoice.
The percent can be over-typed for different inventory, as
required.
The GL account to be used for duty or brokerage costs is
assigned in Default Accounts.
FREIGHT %- Leave this field blank if no allowance for freight costs should
be included in the cost of purchasing inventory from this Vendor.
Enter the percent to be used in the LCF calculation, if there
should be freight costs included in the purchase of inventory from
this supplier.
e.g. 3.00 for 3%
Similar to Duty/Brokerage, this default % value will be
displayed where inventory is invoiced in A/P
Invoices or A/P Invoices By Purchase
Order. If your firm updates the inventory costs in the
warehouse rather than in A/P invoicing, this default % for freight
will be displayed in Purchase Orders, and
Warehouse Receiving instead of in the A/P
invoice.
The percent can be over-typed for different inventory, as
required.
The GL account to be used for freight cost postings is assigned
in Default Accounts.
Note: Contact Texada Support to activate the posting control
flag in Support Application Parameters to
automatically post the Currency Exchange, Duty/Brokerage and
Freight costs to the G/L.
If this flag is not set, any Duty/Brokerage and Freight costs that
are entered, are included in the inventory costs in the Inventory
sub-ledger only, and are not posted directly to the G/L. Manual
posting entries are then required.
- 1099-MISC Processing
- The following three prompts appear only if the 1099-Misc
processing has been activated in the Company
Miscellaneous Parameters.
- DEFAULT 1099-MISC BOX
- Leave this field blank if 1099-Misc processing does NOT apply
for this supplier.
If a code is entered for the supplier, it will automatically
default to every A/P invoice generated for this vendor. It can be
over-typed on the invoice.
The 1099 forms were changed in 2020 and this code is related to
Box#'s 1 to 9, and also 10, 13, 15, 17 on the 1099-Misc forms that
can be generated from U.S. 1099-Misc
Forms.
Box 12 is used for miscellaneous comments and box 16 for the state
number.
Box 14 is for the Non qualified Deferred Compensation.
The 1099 NEC (Non employee Compensation) is captured on a
spreadsheet format manually and referred to as theoretical Box
20.
The code also displays for related invoices in Vendor Account Inquiry.
1099-MISC I.D.- Leave this field blank if 1099-Misc processing does NOT apply
for this supplier or enter the vendor's 1099-Misc I.D. to be
printed on the form printed from U.S.
1099-Misc Forms.
STATE NUMBER- Leave this field blank if 1099-Misc processing does NOT apply
for this supplier or enter the state number for the vendor.
This prints in Box 16 on the form printed from U.S. 1099-Misc Forms.
REOCCURRING PAYMENT AMOUNT- This field can be used to enter a maximum A/P payment amount
for a vendor, so that each time Select A/P
Invoices For Payment is run, a payment check for this
reoccurring amount is generated.
Invoices are paid on an oldest first basis. Discounts are
respected, and partial invoices amounts are paid where necessary to
total this amount.
Enter the maximum amount the supplier is to be paid, each time
A/P payments are generated.
RECURRING A/P INVOICES- Recurring invoices are repeating A/P invoices that must be
generated and paid regularly, and are expensed to the same G/L
accounts and divisions.
There are two approaches offered for creating and posting recurring
A/P invoices.
- True Recurring Invoices are for the same amounts each
payment and are expensed to the same G/L accounts and are created
through the Generate Recurring Invoices
process.
i.e. vehicle lease payments, or property rental payments
- Distribution invoices are expensed to the same G/L
accounts for each regular payment but the dollar amounts may vary
and are calculated as a percent of a total amount defined by the
operator for each invoice.
Select one of the following Recurring Invoice options:
- Select Disabled if Recurring invoicing does not apply to
this supplier.
-
Select Enabled if this supplier requires repeat equal
payments for expenses such as property rent or vehicle leases that
are usually for the same dollar amounts and to the same G/L
accounts.
The Recurring Batch Codes can be setup Recurring Batch Codes with codes and
descriptions.
In the Additional Information click on the  icon to the right, to enter the transaction details of
the expense can be setup in the Recurring A/P
Invoices window.
icon to the right, to enter the transaction details of
the expense can be setup in the Recurring A/P
Invoices window.
The actual regular recurring invoices can then be created in
Generate Recurring Invoices confirmed and
modified if required in Recurring
Invoices and posted in Post Recurring
Invoices.
The A/P invoice number defaults from the Recurring Batch Code.
If multiple recurring invoices are created for the same vendor and
same batch code in the same month, a numeric counter suffix is
added to distinguish the invoices.
-
Select Distribution if this supplier generates regular
Recurring Distribution Invoices that are expensed to the same G/L
accounts on each invoice but the dollar amounts vary.
The dollar amounts are calculated as a percent of the total amount
defined.
In the Additional Information click on the
Gear icon to the right, to enter the distribution
transaction details for the expense as outlined in the Recurring Distribution A/P Invoices.
When A/P Invoices are created for this
vendor, after the header information had been entered the operator
is prompted:
- USE RECURRING A/P INVOICE DISTRIBUTION:
- Click NO then a standard A/P invoice can be entered.
Click YES is be prompted for the AMOUNT TO DISTRIBUTE.
The program then populates the new invoice with the standard G/L
posting Account transactions for this vendor and the distribution
amounts according to the percent allocated to each transaction.
Records can be added, deleted, or modified in the invoice as
required prior to posting.
Distribution Invoices are posted in the regular posting run from
Post A/P Invoices.
TAX INCL. ON INVOICE LINES- This parameter only applies if the Calculate Tax On:
A/P Invoices or Both feature has been activated in
the Company Taxing Parameters to
automatically calculated taxes for the detail lines entered on
Accounts Payable invoices.
This prompt controls the default value set for the Tax Is
Included On Invoice Amounts flag that appears when the operator
on the Default Tax Codes pop-up in A/P
Invoices, and the Amounts Include Taxes flag in A/P Invoice by Purchase Order, and can be
over-typed for an invoice as required.
Check this box if this supplier usually includes the tax amounts
in the invoice line Total and does not provide separate tax
transaction amounts on invoices. This will then default the flag on
invoices for this vendor to calculate taxes out of line total
reducing the line total to add the separate tax transactions, when
entering A/P Invoices for this supplier.
This can always be over-typed for an invoice as required.
Uncheck this box to set the Tax Is Included On Invoice
Amounts default flag to No when entering A/P invoices for this
vendor, so that the calculated taxes are added as separate
transactions on top of the line item Total without reducing the
detail amount entered.
This can always be over-typed for an invoice as required.
EDI EXPORT FOR PURCHASE ORDERS- Certain types of data, including Purchase Orders, can be
defined in the Company Daily Close
Parameters to be exported to XML data files as part of the
Daily Close posting processes.
The rental firm can then use a parser to reformat the output,
creating new files with selected data. This can be useful for
Purchase Order Electronic Data Interchange (EDI).
Check this box if new Purchase Order information for this
supplier should always be exported to XML files.
Once exported, a P.O. cannot be modified further.
Refer to the Company Daily Close Parameters
to activate and setup the export file, email, and parser
features.
Refer to XML Data Exports Menu to review,
modify, or regenerate the XML export transaction information.
Uncheck this box if Purchase orders for this supplier should not
written to an export file.
EMAIL- Enter the supplier's email address if available.
Click on the Envelope icon to the right of the
address to immediately send a message to this address.
Note: Email software must be installed on the workstation in
order to send email.
WEBSITE- Enter an optional URL for supplier. This is information
only.
FREE SHIPPING LIMIT- Enter an optional dollar amount that a Purchase Order must
total to qualify for free shipping from this supplier.
This amount is displayed in the Purchase
Order for reference when entering orders.
Any Free Shipping minimum is also displayed on the
Inventory Re-Order Report and on the
resulting P.O. Worksheet.
INACTIVE- Check this box if this supplier is no longer active and to
prevent a Purchase Order or an AP Invoice from being created for this vendor.
The Vendor Search window will not "find"
Inactive vendors when the search is initiated on a P.O.
Leave this box unchecked if the vendor is active and should
receive Purchase Orders.
Note: When a vendor is flagged as Inactive, any existing
Purchase Orders that have already been created can still be
received and can still be invoiced.
LEASING VENDOR- Check this box if this supplier provides a leasing service on
equipment.
This flag allows the vendor to be defined in the Lease
Information window in Rental Inventory
as a Leasing Vendor. Leasing does not apply to Sales
products.
When rental equipment is linked to a Leasing Vendor a
warning will be triggered if the product is sold in Miscellaneous
Invoices, Rental Return, and in Bulk Disposals.
The Leasing Vendor is included in the spreadsheet output of
the following reports:
Leave this box unchecked if this vendor does not supply any
leasing service.
Note: This field cannot be checked and is disabled for the
"blank" vendor number.
GOVERNMENT ID- An optional government assigned identification number can be
entered for information purposes only.
ALT PAY TO ADDRESS- An “Alternate Payee” name and address can be defined in the
Alternate Pay To Information window for this
Vendor so that the A/P Payments and Purchase Orders will be sent
directly to this address.
When an A/P Computer Check is made to this
Vendor the check is made out to the “Alternate Payee” and is mailed
to the designated address.
Finished?- Click the OK to exit this additional information window.
Any changes are not saved until the entire Vendor
Information record is accepted, and they are lost if the
operator cancels out of the Vendor Information record.
Finished?- Click the ACCEPT button to accept the record and exit, or click
the CANCEL button to abort any changes.
