The Counter Worksheet is a convenient alternative, to use when
entering Contracts, Reservations, or Rental Quotations.
Refer to Counter Procedures for a flow
chart diagramming the counter document process.
An advantage of the worksheet approach is that the rental
products and sales parts can be entered first with prices, allowing
the counter clerk to build a selected product list as the customer
itemizes his requirements.
The rates, prices and product availability, are all displayed on
the screen as each part is added to the worksheet. After the
inventory selection is completed, the worksheet can be converted
into a Reservation, Contract, or Rental Quotation.
Any changes to the rates for a product on the worksheet are carried
through to the converted Reservation, Contract, or Rental Quotation
for that product detail.
The Customer Name, Address, and Billing information is then
recorded to complete the document.
Any discounts given on the product details will apply and will not
be over-ruled or changed when the customer is assigned, even if the
customer has been allowed a regular discount setup in Customer Information.
The regular discount will only be applied to any eligible items
that were not given a discount manually on the Counter
Worksheet.
An auto-assume flag can be set in Kit
File so that the kit items are automatically added to the
worksheet with the default quantities and charges. This speeds up
the product selection process and also prevents the operator from
modifying kit information.
When the auto assume flag is NOT set, kit windows open on the
worksheet prompting for quantities and charges.
Missed rentals and Sales can also be logged from the worksheet, with a Reason Code as setup in Missed Rental Codes.
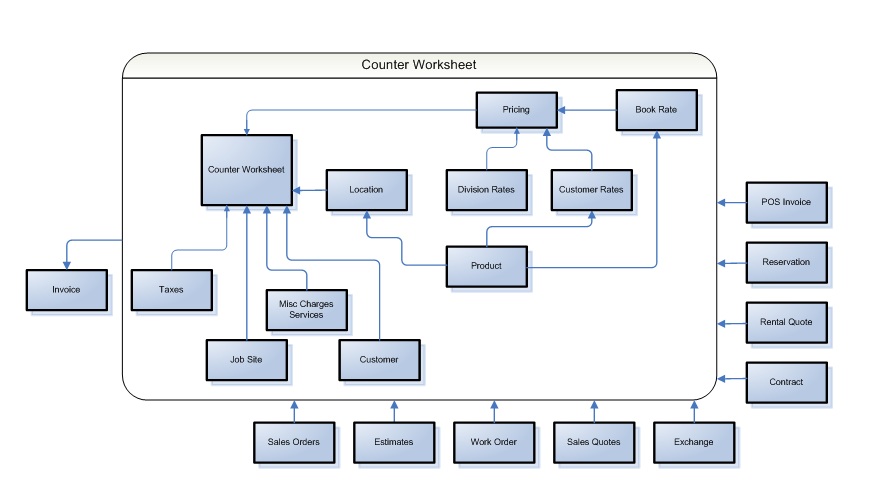
ERD (Entity Relationship Diagram) of Counter
Worksheet:
The Counter Worksheet has the password override processing that
prompts for a password if the user overrides the rental rate, rate
code, or unit price. Overbooked items will also require this
password.
To setup Company Security Parameters and
passwords refer to Module Passwords.
For more information on this security feature refer to System Security Overview.
If the location on the header of the saved worksheet header is
changed, the location is also changed for any Groups on the that
worksheet, and although the location is not automatically changed
for products on the worksheet, a warning is triggered so the
operator is aware that the location on the product details is
different from the document header.
If the product location should also be changed, the products need
to be deleted from the worksheet and re-added so that they are
relieved from the new location.
When a saved Worksheet is deleted and not converted to a contract, a record is written to the deletion log that can be viewed in Delete Log, because a Contract# has been used. The deletion record is listed under function RSRQ04G. The operator code, worksheet number and deletion date are tracked.
COUNTER WORKSHEET:
To generate a Worksheet, select Counter Worksheet from the
Counter menu.
The worksheet could be configured to start with the Counter Worksheet Header, or with the product
details as follows:
Click YES to re-open the existing worksheet that was
interrupted.
Click NO to abort the old worksheet and start a new one.
Note: G/L transactions to update inventory costs always post to the G/L Location from which the inventory was relieved.
PRODUCT ENTRY
Start the document by entering the rental items and sales parts as
outlined next in this sequence.
Defining the Customer on the Worksheet:
If the first sales or rental product is entered directly on the
worksheet before defining the customer in the worksheet header, and
without using the Inventory Search window,
then the Select a Customer for this
Worksheet pop-up will be triggered in order to determine the
correct pricing, taxes and discounts.
If the first product is selected from the Inventory Search window then the Select a Customer for this Worksheet is not
triggered, as the customer for the worksheet then defaults from the
selection filters used in that product search.
DOCUMENT DATE
Enter the document Default Date Out or select the date from
the calendar, before entering the product selection.
Click OK to proceed.
Because the document type has not yet been determined in the Worksheet header, the date range set for module RSWH is checked for valid dates as defined in Date Range Control.
Complete the rental period and rate information for the document
in the Rental Period window.
Because the document division is not yet defined, any division
controlled settings in this window respect the Division Parameters according to the operator
division.
PROMPT FOR STARTING POINT
This option provides the ability to start each worksheet by
prompting the operator to choose one of the three options
(Date/Customer/Products) with which to start this specific
document.
Product Entry on the Worksheet
Confirmation Action Options:
If the Product Details screen is accepted prior to
completing the Customer Information screen, the following options
are available.
Click Return to Details to review the product details of the current Worksheet again.
Click Load Saved Worksheet to re-access an
existing worksheet as outlined in Load Saved
Counter Worksheet.
A flag in the Counter Worksheet Defaults of Company Contract Parameters can be set so that when
a saved worksheet is re-loaded, the operator is immediately
prompted to convert the document to a contract.
When the product details from a saved worksheet are being viewed on
the screen, the Worksheet # is displayed in the top left
corner of the screen.
Click Quit Worksheet to abort and exit the document clearing the products off the worksheet.
Note: Products flagged in Product Status Codes Menu as not available to rent, can not be entered on the worksheet.
If the number is not known, search for the product in one of several of the following ways:
To search by DESCRIPTION type in the description or
alternate description of the Rental item for which to search.
Enter only the first four or five characters.
If too specific (i.e. typing in the whole product description), the
item may be skipped totally if the item was entered slightly
different than expected.
If a single match is identified it will be displayed in the
worksheet, if multiple products are matched they will be listed for
the operator to choose.
Refer to the section in Inventory Search
that addresses the Equipment Search Results options.
To enter a GROUP type in + followed by a Group
number.
If the Group does not have its own rates, a window is triggered to
select a product from that Group to determine the applicable rates,
as outlined in Select Product From
Group.
Note: This applies to Groups for Rental equipment. Sales Groups cannot be reserved on a worksheet.
Other OPTIONS provided in the Inventory Search and Action Options window on the Product # field include:
Security:
If the operator has been given Security Role
Permissions in the Document Access Fields to change
product descriptions in document entry, this product description
can be over-typed if required.
If the automatic display of sales history is suppressed this information can still be viewed on the product detail line on the document by windowing on the Unit Price field, and in the resulting Special Pricing table, clicking on the SALES HISTORY button.
Other system controlled status codes that could apply on existing contracts, include:
   S = SOLD     -if the sales item has been sold on an invoice
   R = RETURNED -if the rental item has been returned
   F = OFF RENT -if the rental item is currently off rent
                 (i.e. clock is stopped but equipment is not yet returned)
Security:
The Allow Overrides on Location Quantities flags in the
Company Security Parameters controls whether
products can be over-booked on the document.
Negative Quantities:
To generate a credit, a negative quantity can be entered for a
sales or rental product.
Security:
For security to control the operator's ability to enter negative
quantities, set up roles and a password in the Module Passwords for NEGQTY, so that operators
with no role permission need to enter the password in the Password Authorization pop-up window generated
when a negative quantity is entered.
Over-Supply:
For sales items, more quantity can be entered than the customer may
require.
For example, if 10 pieces of sandpaper are put out with a sander,
any unused quantity can be returned during Rental Return.
e.g. return 2 unused sheets and charge for only the 8 sheets
used
Zero Quantity:
Sales Product Classes or Rental Product Classes can be flagged to allow or
prevent zero quantities on the worksheet, but negative quantities
are not allowed.
If an item still has a zero quantity when the worksheet is
converted to a contract then that line item is omitted from the new
contract.
Serialized sales parts must always have a quantity of 1 regardless
of the Product Class flag.
Division Discrepancy:
In Divisional Inventory Parameters a flag
can be set to generate a warning if a non-bulk rental product
belongs to a different division from the division on the worksheet,
as outlined in Renting/Owning
Discrepancy.
If the serialized sales part is flagged to enter the serial numbers at "Time of Sale", the operator can select an existing serial number, or click ADD to add one at this time.
Note: Each serialized item sold must have its own sequence number (line detail) to allow the serial # to print properly on the contract and invoice.
Within the Special Pricing window, a second window is provided to view Sales Product History for this customer for this product.
If there is any current valid circular pricing setup for the sales item, then after the quantity is entered on the document, the Select Circular Pricing window automatically opens to display circular pricing options, and the operator can select the appropriate pricing.
Rental Product:
If the Prompt for Rates on Contract flag is set in the
Divisional Rate Parameters then the rates
window is always triggered as outlined in Rental
Rates.
If the rental of this equipment causes the customer to exceed his Rental Value Limit the Exceeded Rental Value Limit warning is displayed.
Accept the rental rate per unit for the period, or override the
rate with the correct rate.
This is the amount before the Discount.
Security:
The ability to Allow Override Of Rental Rates is controlled
in the Company Security Parameters.
This parameter controls the ability to over-ride rental rates and
rental dollar amounts on rental documents.
When this company wide control is set to prohibit rate over-rides,
any rate adjustments at document entry must be done through the
discount process.
A flag in the Company Rate Parameters can
be set to control whether the Rental Rate Override Prompts for
All Rates.
This controls whether all rates for this product detail are
automatically overridden proportionately, or whether the operator
is given the option in document entry as follows:
e.g. If a rental rate is lowered the system calculates the percentage it is lowered such as a 10% reduction. Then when the operator selects to also reduce the meter rates, the system will lower the meter rate associated with that rate level by that same 10 %.
Note: The other product details on the worksheet are NOT affected by these rental rate or meter rate changes, nor is the main product rate file updated.
This window opens automatically to confirm the rental dates and rates, if the document Date Out is prior to today's date.
Click YES to recalculate the rental rate based on the revised
information.
Click NO to accept the displayed Unit Rate and close the
window.
(UNIT PRICE - DISCOUNT AMOUNT) * QUANTITY
Over-Ride Extended Security:
Some firms allow the Extended amount to be overridden for
Sales items.
This is convenient if deals are made at the counter for a specific
price instead of using the percentage discount feature.
Example: $0.43 each or 3 for $1.00
The ability to Override Extended for Sales products can
be set or restricted in the Company Security
Parameters.
Any override is tracked automatically and reported in Print Override Report.
A setting in the Divisional Contract Parameters controls whether the worksheet detail notes window opens automatically for Rentals, Sales, Both, or Neither.
Note: The Tax Code NTX over-rides any other code at any level.
Enhanced Tax window:
The taxes and exemptions to be applied are displayed as explained
for Enhanced tax processing in Taxes and
Exemptions.
If the operator has role permission, the tax codes can deleted in
the window and the exemptions can be modified as required.
Vertex Taxing:
Because Vertex Tax Software calculates the tax amounts and allows
for any exemptions, Tax Code 1 is always interpreted as Y and Tax
Code 2 as NTX as the taxes are combined in the Tax 1 value.
Discount Security:
Note: If changing the discount % does not yield the desired Extended Amount, set the discount percent to 0.00 and change the Unit Price to the desired amount.
Trade Discount percents are setup in the customer record, and
are given on equipment rentals only when the invoice is paid by the
discount date established from the Terms code.
Specific Product Classes, and Rate Code levels can be flagged to
disallow Trade Discounts.
Once the Trade Discount is disallowed on a product detail on a
contract, reservation, or quotation, it will NOT be reinstated even
if the restricting factor is changed. To re-instate a Trade
Discount, the product detail line must be deleted and
re-entered.
For more information on this discount feature refer to the Trade Discounts.
Confirmation Action Options:
Note: When a worksheet is converted, the product detail information is recalculated per the worksheet header, so the new document may not reflect any individual product date changes or discount changes made in the worksheet details.
To convert to a Contract, any Groups on the Worksheet must be
replaced with specific product numbers. A barcode can be used to
captured the specific product.
Any serialized Sales Parts must also be assigned the serial
numbers.
Refer to the Counter Worksheet Header page
for details on Convert Requirements including meter update,
off-rentals, over-booking, converting groups, and product
sequencing.
If any attachments such as images or external documents are linked to the source Worksheet, they will also be linked to the document resulting from the convert action.
Note: If any item on the worksheet cannot be filled (i.e. serialized part # or Group product not selected, etc.) the worksheet will not be converted, but will be saved to the Saved Worksheet file.
Click Delete Worksheet to abort the worksheet and delete the details from page so the products can be re-entered.
If a saved worksheet is to be deleted, confirmation is required to delete the worksheet, and a record is written to Delete Log to note the Contract # that was used. The deletion record is listed under function RSRQ04G. The key WS# is assigned and the operator code, worksheet number and deletion date are tracked.
Any product detail lines that are deleted from a saved Worksheet, also write a record to Delete Log to track the product information that was deleted from the document under function RSRQ04.
Note: A Worksheet with unposted deposits cannot be deleted.
Any Deposits need to be credited or reversed in Counter Worksheet Totals and Daily Close 1 must be run to post them, before
that Worksheet can be deleted successfully.
Click Load Saved Worksheet to re-access an
existing worksheet as outlined in Load Saved
Counter Worksheet.
When the product details from a saved worksheet are being viewed on
the screen, the Worksheet # is displayed in the top left
corner of the screen.
A flag in the Counter Worksheet Defaults of Company Contract Parameters can be set so that when a saved worksheet is re-loaded, the operator is immediately prompted to convert the document to a contract.
Click Save and Print Worksheet to complete the
worksheet header information, save it, and print a copy.
Refer to the details on the action to Save Worksheet below,
for information on the parameters and options available in the save
process.
Then to print the worksheet a printer can be selected from the Printer option located on the menu bar at the top of the screen, and the operator is now prompted:
Click NO to print the worksheet without prices, rates, and extensions.
Click Return to Header to review or update the customer billing and site information defined on the Counter Worksheet Header.
Click Save Worksheet to save the product details
to a worksheet with a permanent contract #, that can later be
re-loaded.
The details are then erased from the current screen display.
The Counter Worksheet Header information MUST be entered before the worksheet can be saved.
A prompt in the Company Contract
Parameters controls how the saved worksheet is numbered.
The auto-assign option, numbers the worksheet with the next
available contract number. Alternatively, the operator can be
prompted to enter a New Worksheet# number of choice.
When the worksheet is later converted to a contract, this number
will then also become the contract number.
The Services and Totals window is triggered if one of the
Counter Worksheet Defaults in the Company
Contract Parameters has been set to prompt for Services or to
prompt for a worksheet Deposit, as outlined in Counter Worksheet Totals.
Any relevant automatic Services associated with a product through
the Class or Group will only be added to the 'Counter Worksheet'
when the worksheet is saved, if the feature to Prompt for
Services when Saving is activated in the 'Counter Worksheet
Defaults' in the Company Contract
Parameters.
If the Worksheet was originally created by converting from a Reservation using the utility Convert Reservation To Counter Worksheet the Services and Totals window that determines deposit and service information will display, even if the Counter Worksheet Defaults in Company Contract Parameters are set to suppress this totals screen when saving a worksheet.
Click Quit Worksheet to abort and exit the document clearing the products off the worksheet.
Worksheet Header Information
Refer to Counter Worksheet Header for
details on the completing the document header, and converting it to
a Quotation, Reservation, or Contract.
Services and Totals Information
Refer to Contract Summary and Totals for
details on the completing the services and payment details for the
document.
| Converted from CHM to HTML with chm2web Pro 2.85 (unicode) |