- SEQ
- Sequence numbers are automatically assigned to track and
organize the records in the file.
Multiple records can be entered.
REPORT DEVICE DESCRIPTION- Describe the device that will be receiving the report.
e.g. Accounting Printer, or Print to a Text File, or Local Printer.
DEVICE NAME- Enter the technical name for this device.
e.g. system, REPORT.TXT, LPT1Device Name Restrictions:
Device name cannot contain ">" character.
Device name cannot contain a "/" character unless path is /dev/null or starts with /tmp/
Device name can not be a directory.Note: For Windows and Windows-NT systems, when entering a device name for a text file, the FULL pathname of the file must be entered.
e.g. C:\PRO4DATA\REPORT.TXT
TYPE- Select a type that suits the printer/device from the drop-down
list.
The types include:- Spool to a Queue Name
- Spool to a File Name
- Spool to a Device Name - not supported to "LPx" or "LPx:RAW" in a Web Browser session (Open Client)
- Spool to a Network Device
- Print to the Screen - not supported by a Web Browser session (Open Client)
- Print to Attached Printer - not supported by a Web Browser session (Open Client)
- Print to a Queue Name
- Print to a File Name
- Print to a Device Name - not supported to "LPx" or "LPx:RAW" in a Web Browser session (Open Client)
PRINTER CODES- Select a printer type that suits the printer/device from the
drop-down list.
If the available printer types do not suit, setup the printer type and its codes using Printer Codes
WINDOWS DEST- This destination field only applies when Type 5 for
printing to a CRT has been entered.
It applies only to Windows Clients and the Printer Codes must be set to WIN-CRT as setup in Printer Codes (codes default automatically).The advantage of printing in this way, is that PRO-IV printing can be totally by-passed, and all printing is handled by the windows workstation.
Select one of the following for this CRT print option:
- A - ADOBE PDF - print to a PDF page
- D - DOCUMENT - print to a local RTF Viewer
- E - EMAIL - to generate the output to an email
- P - DEFAULT PRINTER - print to a local default printer using RTF Viewer
- W - WEB PAGE - print to a local HTML Viewer
D and P options work with the default viewer for ".rtf" files such as Microsoft Word viewer, or Microsoft Word.
However Microsoft Word could take longer to close if opened from within SRM software.
Note: Wordpad will NOT work, because it does not handle the rtf \Page command.
LINUX Examples:
REPORT DEVICE DESCRIPTION    DEVICE NAME          TYPE   PRINTER TYPE
-------------------------    -----------          ----   ------------
LINUX system printer         system                3     Print To A Device Name
local LINUX printer          AP                    6     Print To Attached Printer
local LINUX printer          /dev/pri1a            9     Print To A Device Name
print to a text file         REPORT.TXT            8     Print To A File Name
print to a 2nd text file     REPORT2.TXT           8     Print To A File Name
print to Bill's text file    /usr/bill/report.txt  8     Print To A File Name
Windows and NT Examples:
                                                       PRINTER                  WINDOWS CLIENT
REPORT DEVICE DESCRIPTION    DEVICE NAME         TYPE    TYPE                    SEND CRT TO
-------------------------    -----------         ----  --------                 --------------
Server printer                LPT1                  9   Print To A Device Name
Network printer (HP)           \\ntserver\HP        9   Print To A Device Name
print to a text file           C:\PRO4DATA\RPT.TXT  8   Print To A File Name
print to a 2nd text file       C:\PRO4DATA\RPT2.TXT 8   Print To A File Name
print to W95 text file         c:\pro4data\rpt1.txt 8   Print To A File Name
print to local printer         LP1:RAW              4   Spool To A File Name   *
print to Windows printer       LP0:RAW              4   Spool To A File Name   *
Windows CRT to WEB PAGE        CRT                  5   WIN-CRT             W
Windows CRT to DOCUMENT        CRT                  5   WIN-CRT             D
Windows CRT to DEFAULT PRINTER CRT                  5   WIN-CRT             P
* Windows Printer by Workstation:
This provides flexibility allowing each employee to map their workstation to a preferred printer of the same type. (i.e. uses same printer codes)
Once the printer device is setup here, each workstation can map their printer of choice in Windows, by clicking on Printer option on the menu bar at the top of the screen and then selecting Set Windows Printer from the drop-down list, and setup as follows:
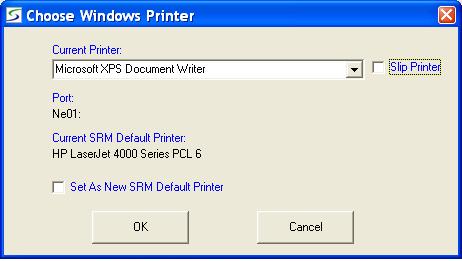
- CURRENT PRINTER
- Select the preferred printer from the drop-down selections.
All printers using a selection, must also use the same printer codes. (e.g. HP )
These printers must first be added in Windows "Printers" on "My Computer".
SLIP PRINTER- Check this box if this is a slip printer device.
Uncheck this box is this is a standard report printer.
PORT- The associated port is displayed.
CURRENT SRM DEFAULT PRINTER- The current printer is displayed.
SET AS NEW SRM DEFAULT PRINTER- This option only applies when the Current Printer is
changed.
Check this box if this printer should be designated as the default for this workstation.
Uncheck this box if this printer is only a temporary selection.
Finished?- Click OK to save the printer mapping.
After adding a Windows printer, the printer must be re-selected for the changes to take effect.
Example: